So fügen Sie eine benutzerdefinierte Willkommensnachricht zu Ihrem Dokumentenlink hinzu
Eine kurze Willkommensnotiz hilft dabei, den richtigen Ton zu setzen, bevor Betrachter auf Ihr Dokument zugreifen. Sie können diesen Text im Tab Branding eines beliebigen Dokuments hinzufügen oder aktualisieren. Die Funktion ist in allen Tarifen verfügbar.
Bevor Sie beginnen
• Sie benötigen Eigentümer- oder Bearbeiter-Zugriff auf das Dokument.
• Das Dokument muss über einen Link geteilt werden.
Schritt für Schritt
-
Branding öffnen – Klicken Sie in der linken Seitenleiste auf Branding, um auf die Konto-Branding-Einstellungen zuzugreifen.
-
Zu Dokumenten-Branding wechseln – Klicken Sie oben auf der Branding-Seite auf den Tab Dokumenten-Branding.

- Zu "Willkommensnachricht" scrollen – Scrollen Sie nach unten, um das Feld "Willkommensnachricht" zu finden, das sich unterhalb der Farb- und Banner-Einstellungen befindet.
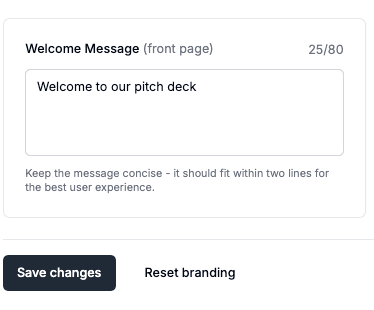
- Nachricht eingeben – Geben Sie bis zu 150 Zeichen ein.
- Änderungen speichern – Klicken Sie unten auf Änderungen speichern. Eine Benachrichtigung bestätigt die Aktualisierung.
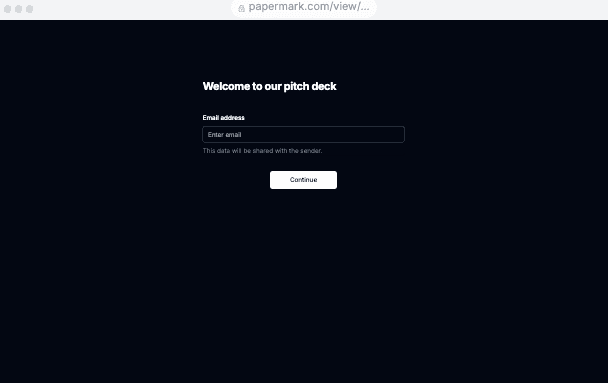
- Vorschau anzeigen – Wechseln Sie oben rechts im Branding-Bereich zum Tab Startseite, um die Willkommensnachricht im Kontext zu sehen.
Tipp: Halten Sie die Nachricht kurz und handlungsorientiert – z. B. "Willkommen! Bitte geben Sie Ihre E-Mail-Adresse ein, um fortzufahren."
Wo die Nachricht erscheint
Die Willkommensnachricht wird angezeigt:
- Auf der Startseite jedes Dokumentenlinks, den Sie teilen (vor der E-Mail-/Passwortabfrage).
- Sowohl in der Desktop- als auch in der mobilen Ansicht.
Best Practices
- Passen Sie Ihre Markenstimme an – bleiben Sie freundlich und prägnant.
- Wenn Sie eine E-Mail-Verifizierung oder einen Passwortschutz benötigen, erläutern Sie dies hier.
- Aktualisieren Sie die Nachricht für verschiedene Zielgruppen, indem Sie separate Dokumentenlinks mit angepasstem Text erstellen.