Encrypting files on your Mac is essential for protecting sensitive information like financial documents, legal contracts, or personal data. Whether you're securing individual files or your entire disk, macOS provides built-in encryption tools that use strong cryptographic algorithms to protect your data from unauthorized access.
When you encrypt files on Mac, macOS uses AES encryption to transform your data into unreadable code that can only be decrypted with the correct password or key. Understanding which files need encryption helps you prioritize security efforts for sensitive documents. This guide covers multiple methods to encrypt files on Mac, from full disk encryption to individual file protection.
Quick recap of Mac file encryption methods
FileVault: Full disk encryption for your entire Mac startup disk
Disk Utility encrypted images: Create password-protected disk images for folders and files
PDF encryption: Password-protect individual PDF documents
Secure file sharing: Use cloud-based platforms for encrypted file sharing with additional features
Third-party encryption tools: Use specialized software for advanced encryption needs
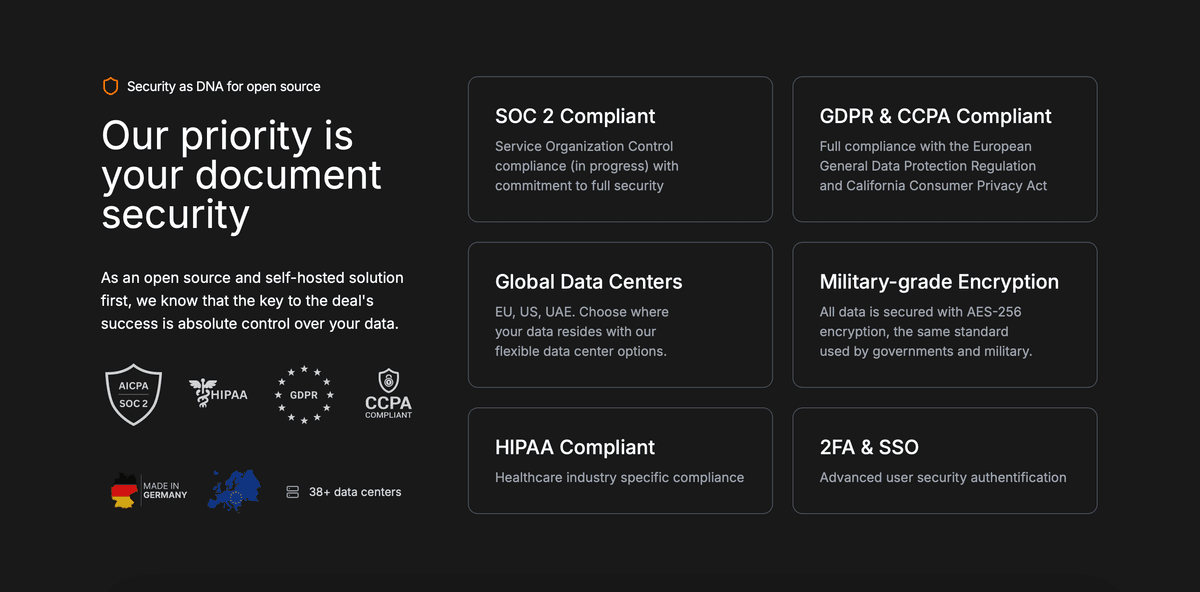
Protect your documents with advanced security
No credit card required
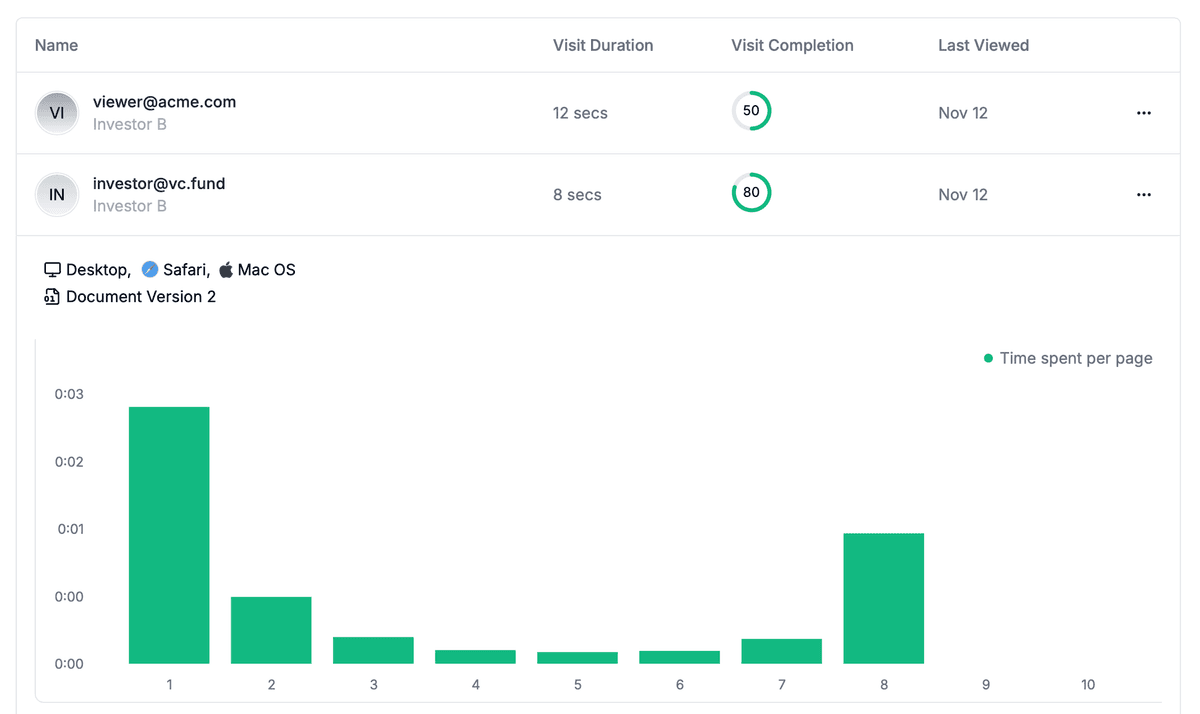
Page by page analytics
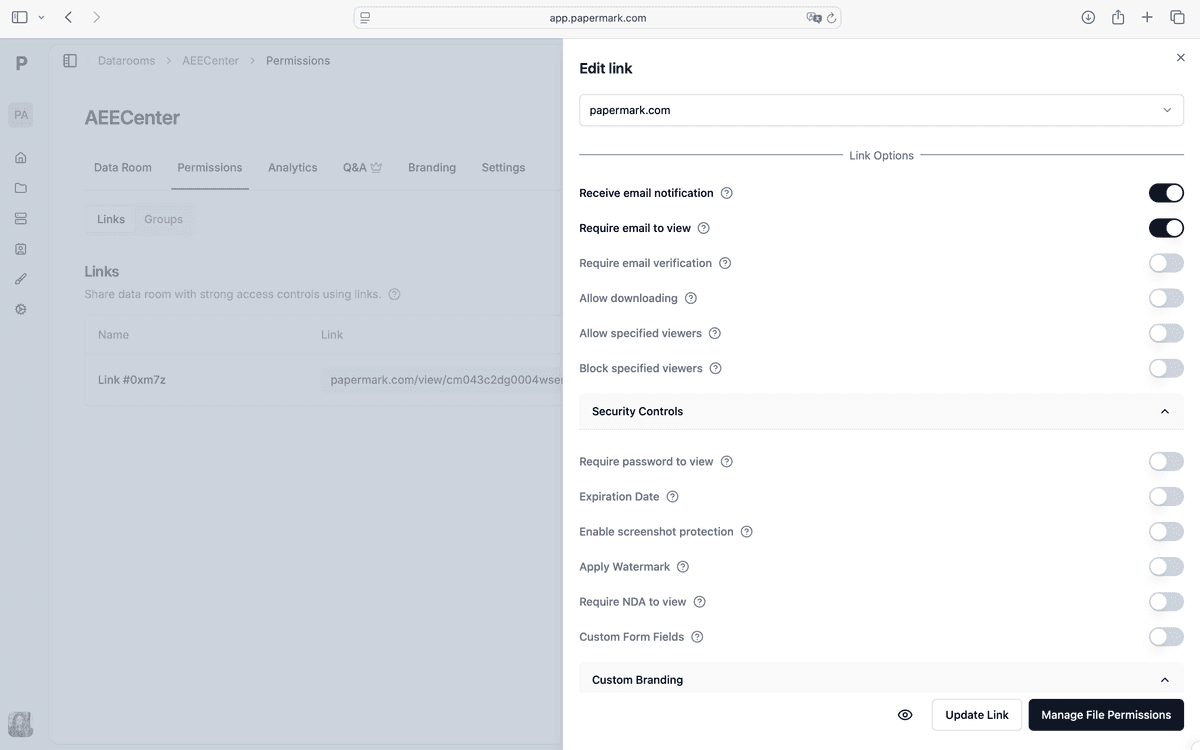
Require email verification
Require password to view
Allow/Block specified viewers
Apply Watermark
Require NDA to view
Custom Welcome Message
Method 1: Using FileVault for full disk encryption
FileVault encrypts your entire startup disk, automatically protecting all files on your Mac with XTS-AES-128 encryption. Once enabled, all files are encrypted and decrypted transparently as you use your Mac.
Step-by-step guide for enabling FileVault:
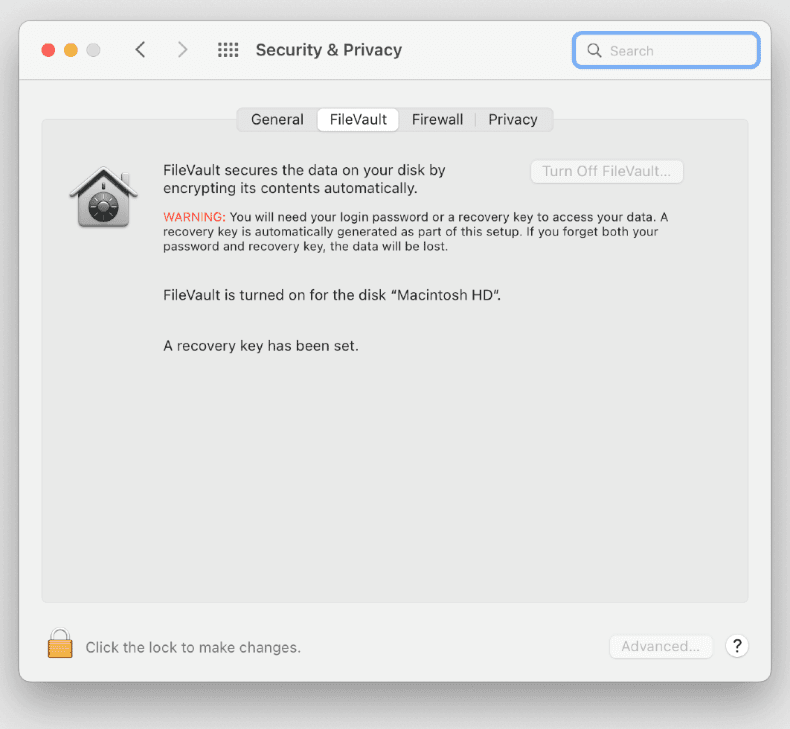
Open System Settings:
Click the Apple menu (🍎) in the top-left corner
Select System Settings (or System Preferences on older macOS)
Click Privacy & Security
Scroll down to FileVault
Enable FileVault:
Click the lock icon (🔒) to make changes
Enter your administrator password
Click Turn On FileVault
Choose recovery method:
Use iCloud account: Allows you to unlock your disk using your Apple ID
Create a recovery key: Generates a unique recovery key you must store securely
Choose the option that works best for you
Store your recovery key:
If you chose to create a recovery key, macOS will display it
Write it down and store it in a secure location
You'll need this key if you forget your password
Click Continue after storing the key
Restart your Mac:
macOS will prompt you to restart
The encryption process begins after restart
Initial encryption may take several hours depending on disk size
You can continue using your Mac during encryption
Important notes: FileVault encrypts your entire startup disk, including system files, applications, and user data. Once enabled, you must enter your password or use your recovery key to unlock your disk when starting your Mac. The encryption is transparent—files are automatically decrypted when you're logged in and encrypted when you're not.
Security benefit: FileVault protects all files on your Mac, including deleted files that haven't been securely erased. If your Mac is lost or stolen, the encrypted data cannot be accessed without your password or recovery key.
Method 2: Creating encrypted disk images with Disk Utility
Disk Utility allows you to create encrypted disk images—password-protected containers that you can mount like external drives. This method is ideal for encrypting specific folders or files without encrypting your entire disk.
Step-by-step guide for encrypted disk images:
Open Disk Utility:
Go to Applications > Utilities > Disk Utility
Or press Command + Space and type "Disk Utility"
Create a new disk image:
Click File > New Image > Blank Image
A dialog box will appear
Configure the disk image:
Name: Enter a name for your encrypted disk image
Size: Set the size based on your needs (e.g., 1 GB, 5 GB, 10 GB)
Format: Choose APFS (recommended) or Mac OS Extended (Journaled)
Encryption: Select 128-bit AES encryption or 256-bit AES encryption (recommended)
Partitions: Choose Single partition - GUID Partition Map
Image Format: Select read/write disk image
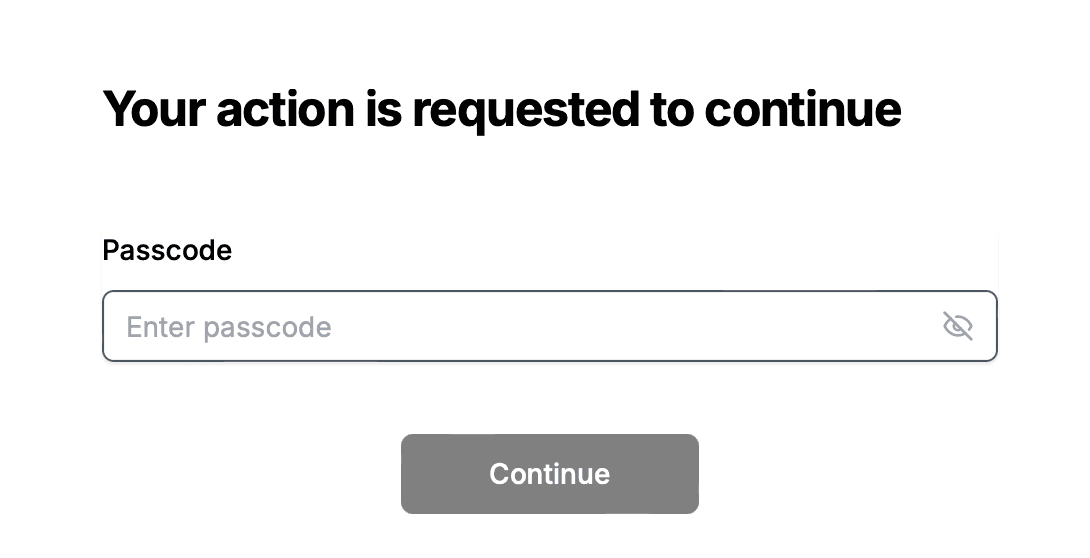
Set a password:
Click Save
Enter a strong password in the password field
Confirm the password
Optional: Check "Remember password in my keychain" to avoid entering it each time
Click Choose to create the disk image
Use the encrypted disk image:
The disk image appears on your desktop or in Finder
Double-click the .dmg file to mount it
Enter your password when prompted
The encrypted volume mounts like an external drive
Drag files and folders into the mounted volume
Eject the volume when done to secure your files
Best practices: Use strong passwords with at least 16 characters, mixing uppercase, lowercase, numbers, and special characters. Store the password securely, as you cannot recover files from an encrypted disk image without it. For detailed guidance on password-protected encryption, see our guide on how to encrypt a file with a password.
Method 3: Encrypting existing folders
You can convert existing folders into encrypted disk images, protecting all files within the folder.
Step-by-step guide for encrypting folders:
Open Disk Utility:
Go to Applications > Utilities > Disk Utility
Create image from folder:
Click File > New Image > Image from Folder
Select the folder you want to encrypt
Click Choose
Configure encryption settings:
Name: Enter a name for the encrypted disk image
Encryption: Select 128-bit AES encryption or 256-bit AES encryption
Image Format: Choose read/write disk image
Click Save
Set password:
Enter a strong password
Confirm the password
Click Save
Secure the original folder:
After creating the encrypted disk image, securely delete the original folder
The encrypted .dmg file now contains all your files
Mount the disk image when you need to access files
Use case: This method is ideal for encrypting project folders, document collections, or backup archives that you want to protect with password encryption.
Method 4: Password-protecting PDF files
macOS Preview allows you to encrypt PDF documents with password protection, securing individual PDF files without creating disk images.
Step-by-step guide for PDF encryption:
Open the PDF in Preview:
Right-click the PDF file
Select Open With > Preview
Or double-click the PDF to open it in Preview
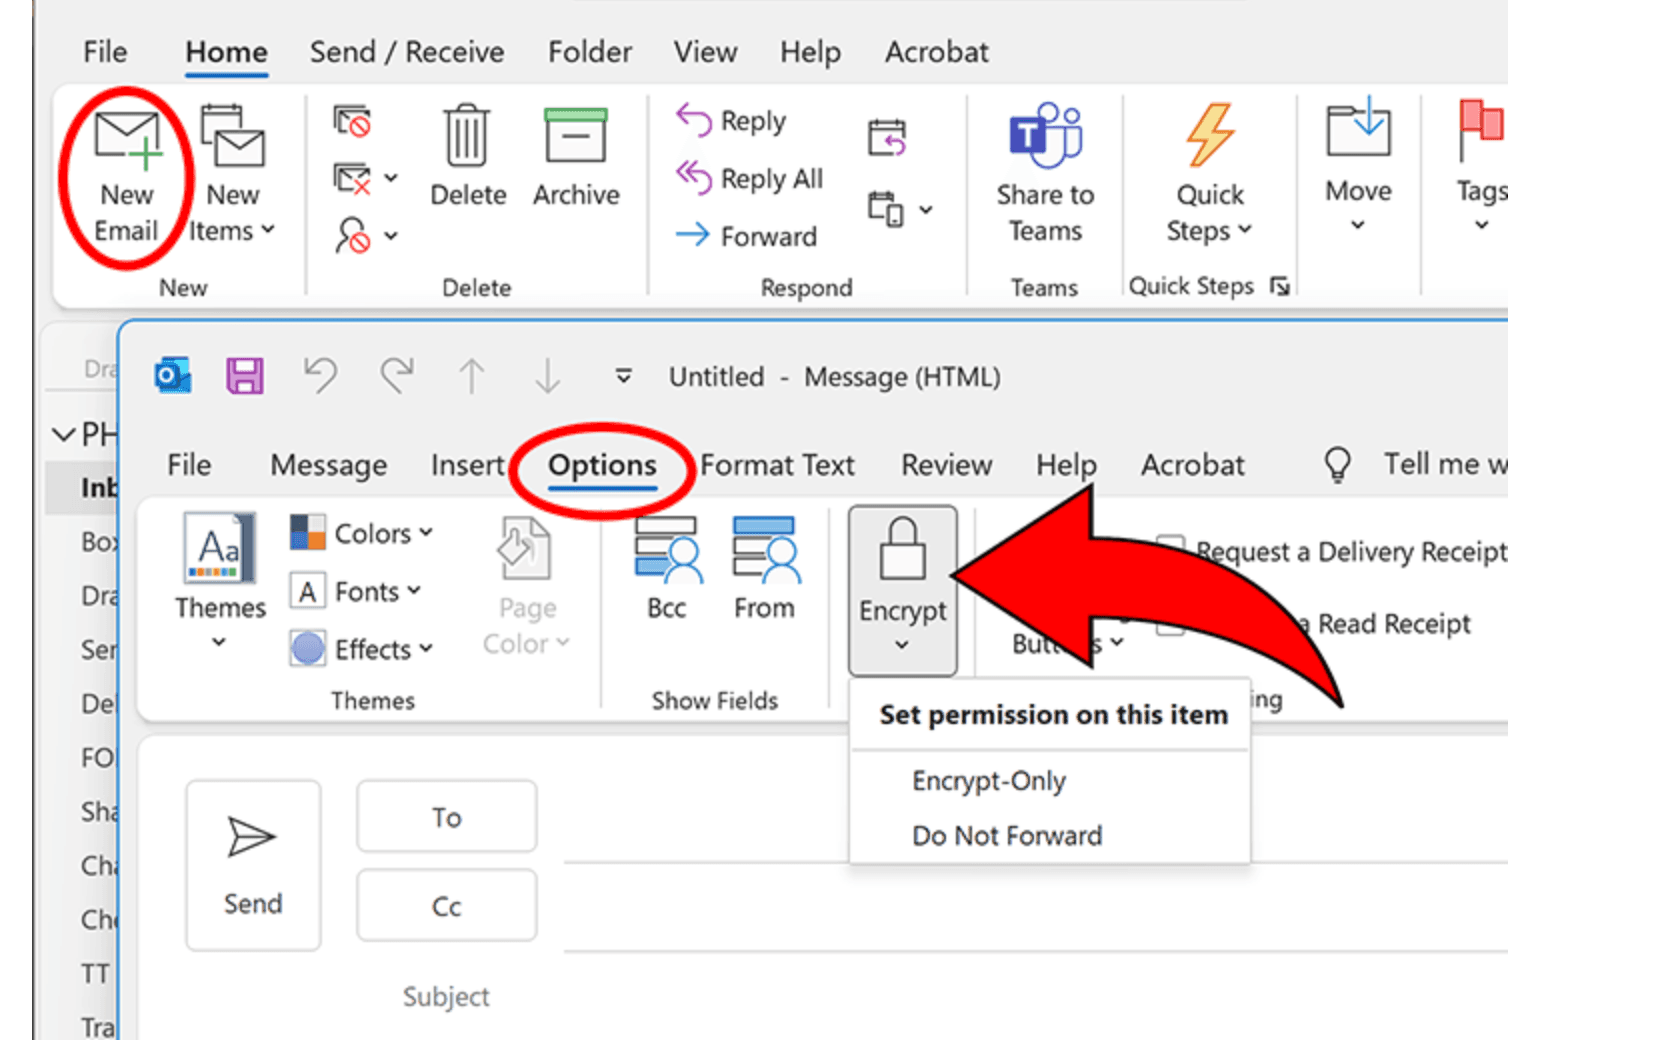
Export with encryption:
Click File > Export
Choose a location to save the encrypted PDF
In the Format dropdown, ensure PDF is selected
Enable encryption:
Check the "Encrypt" checkbox
A password field will appear
Enter a strong password
Confirm the password
Save the encrypted PDF:
Click Save
The PDF is now password-protected
You can delete the original unencrypted PDF if desired
Note: Preview uses AES-128 encryption for PDF password protection. For stronger security, consider using Adobe Acrobat or creating an encrypted disk image containing the PDF.
Method 5: Using secure file sharing platforms
For sharing encrypted files with others, cloud-based secure file sharing platforms provide encryption plus additional features like access controls, analytics, and the ability to revoke access.
Step-by-step guide for secure file sharing:
Upload your file to a secure platform:
Use Papermark or another secure file sharing service
Upload your sensitive document
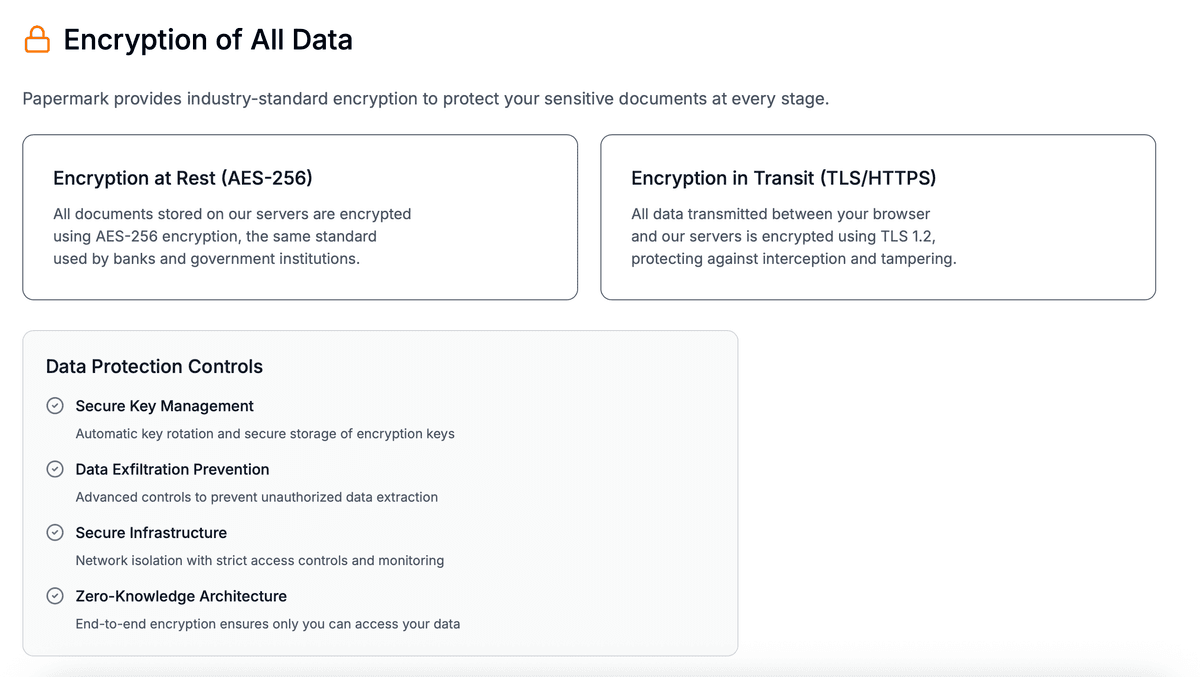
The file is automatically encrypted with AES-256 encryption
Configure security settings:
Enable password protection for the document
Set access expiration dates if needed
Enable email verification to require recipient identity confirmation
Configure allowlist/denylist to control who can access
Share the encrypted file:
Generate a secure link
Share the link via email or messaging
Provide the password through a separate, secure channel
Benefits: This method provides encryption plus access tracking, analytics, and the ability to revoke access even after sharing. It's ideal for sharing sensitive files with clients, partners, or team members. Learn more about which files need encryption to determine when to use this approach.
Comparison: Mac file encryption methods
Method
Encryption level
Ease of use
Scope
Best for
FileVault
XTS-AES-128
Easy
Entire disk
Full disk protection, all files
Disk Utility encrypted images
AES-128 or AES-256
Moderate
Selected folders/files
Specific file protection, portable containers
PDF encryption
AES-128
Easy
Individual PDF files
PDF document protection
Secure file sharing
AES-256
Easy
Shared files
File sharing with tracking and access controls
Best practices for encrypting files on Mac
Follow these practices to maximize the security of your encrypted files on Mac.
Use strong passwords: Create passwords with at least 16 characters, mixing uppercase, lowercase, numbers, and special characters. Use unique passwords for different encrypted files or disk images.
Store passwords securely: Use a password manager to store encryption passwords. Never store passwords in unencrypted text files or share them in the same message as encrypted files.
Enable FileVault for full protection: If your Mac contains sensitive information, enable FileVault to encrypt your entire disk. This protects all files, including system files and deleted data.
Backup encryption keys: Always backup FileVault recovery keys and store them securely. If you lose your password and recovery key, you cannot recover encrypted data.
Use appropriate encryption strength: For highly sensitive data, use AES-256 encryption when available. AES-128 is also secure for most use cases.
Combine encryption methods: Use FileVault for full disk protection and encrypted disk images for specific sensitive folders or files that need additional protection.
Regularly update macOS: Keep your Mac updated with the latest security patches to ensure encryption features work correctly and vulnerabilities are addressed.
Securely delete original files: After creating encrypted versions, securely delete original unencrypted files using the "Secure Empty Trash" option or third-party secure deletion tools.
Test encryption before relying on it: Verify that encrypted files cannot be opened without the password before storing sensitive information. Test recovery procedures to ensure you can access encrypted files when needed.
Use secure file sharing for collaboration: When sharing encrypted files with others, use secure file sharing platforms that provide encryption, access controls, and tracking capabilities.
Conclusion
Encrypting files on your Mac protects sensitive information from unauthorized access, whether you're securing individual documents or your entire disk. FileVault provides comprehensive full disk encryption, while Disk Utility encrypted images offer flexible protection for specific files and folders. For sharing encrypted files, secure file sharing platforms combine encryption with password protection, access controls, and detailed analytics.
Choose the encryption method that matches your security needs, and always follow best practices like using strong passwords and securely storing recovery keys. For comprehensive file encryption with advanced security features, consider using platforms like Papermark that combine encryption with password protection, access controls, and detailed analytics.