Comment inviter des visiteurs dans votre data room par e-mail
Papermark vous permet d'envoyer des invitations par e-mail directement depuis votre data room, afin que vos visiteurs reçoivent un e-mail professionnel et personnalisé à votre image, avec un lien vers votre contenu. Au lieu de copier un lien et de rédiger votre propre e-mail, vous pouvez inviter plusieurs destinataires à la fois avec un message personnel optionnel, sans jamais quitter Papermark.
Ceci est particulièrement utile pour les levées de fonds, les audits de diligence raisonnable et la gestion de flux d'affaires lorsque vous souhaitez suivre précisément qui a été invité et qui a réellement ouvert votre data room.
Prérequis
- Une data room contenant au moins un document
- Un lien partageable déjà créé pour la data room
- Un abonnement Business, Data Rooms ou Data Rooms Plus
Si vous n'avez pas encore configuré de data room, commencez par Comment créer une data room. Si votre data room est prête mais que vous n'avez pas encore créé de lien, suivez d'abord les étapes de Comment partager votre data room.
Étape 1 : Ouvrir le menu d'actions du lien
- Ouvrez votre data room
- Cliquez sur l'onglet Permissions
- Trouvez le lien que vous souhaitez utiliser pour les invitations
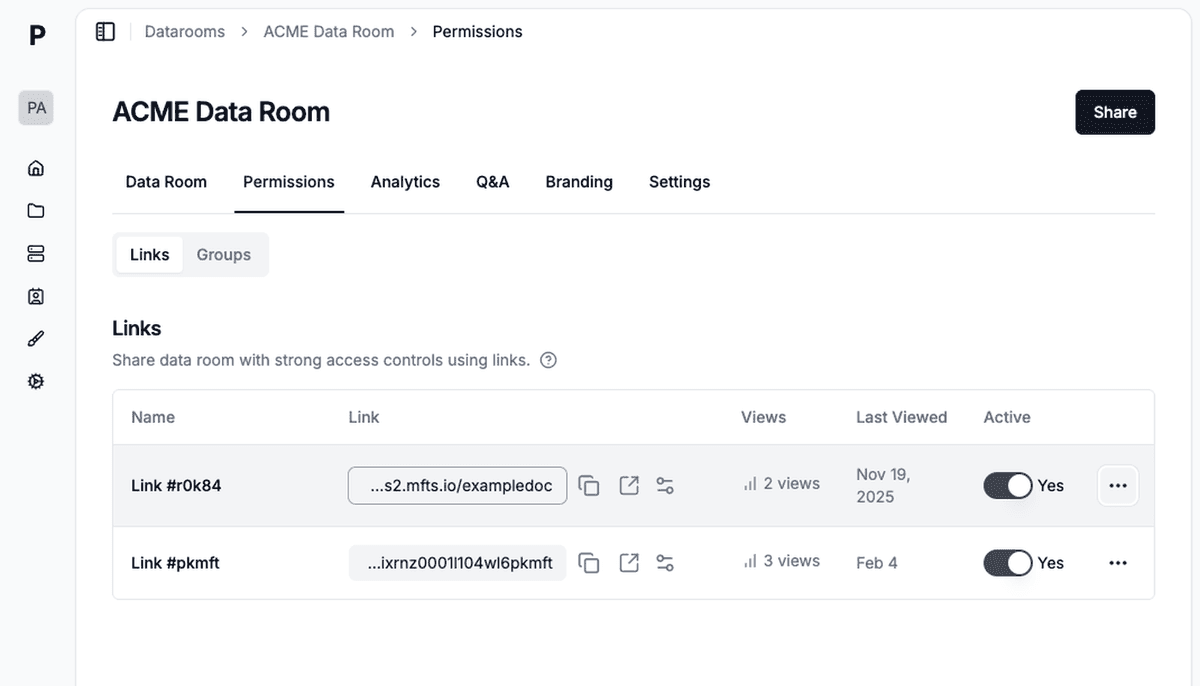
- Cliquez sur le menu trois points (⋯) sur le côté droit de la ligne du lien

- Sélectionnez Envoyer des invitations dans le menu déroulant
Étape 2 : Ajouter des destinataires
Dans la fenêtre d'invitation, vous verrez deux panneaux. Le côté gauche est l'endroit où vous rédigez votre invitation, et le côté droit affiche un aperçu en temps réel de l'e-mail que vos destinataires recevront.

Saisissez les adresses e-mail des personnes que vous souhaitez inviter dans le champ Destinataires. Vous pouvez ajouter plusieurs adresses en saisissant une adresse par ligne ou en les séparant par des virgules. Il n'y a pas de limite stricte quant au nombre de destinataires que vous pouvez ajouter en une seule fois.
Étape 3 : Rédigez un message personnalisé (facultatif)
Le champ Message personnalisé vous permet d'ajouter une note personnelle à votre invitation. Ce message apparaît dans le corps de l'e-mail, au-dessus du lien vers votre salle de données. Vous pouvez rédiger jusqu'à 2 500 caractères.
Quelques idées pour votre message :
- Présentez-vous ainsi que votre entreprise
- Expliquez le contenu de la salle de données
- Mentionnez un calendrier ou une échéance de consultation
- Faites référence à une conversation ou une réunion récente
Laisser ce champ vide est tout à fait possible. Les destinataires recevront tout de même un e-mail soigné et personnalisé à votre image, avec un lien direct vers votre data room.
Étape 4 : Aperçu et envoi
Avant l'envoi, vérifiez l'aperçu de l'e-mail sur le côté droit de la fenêtre modale. Il affiche exactement ce que vos destinataires verront, y compris votre message personnalisé et le lien vers la salle de données.
Lorsque tout semble correct, cliquez sur Envoyer les invitations. Papermark envoie immédiatement l'e-mail à tous les destinataires.
Ce que reçoivent les visiteurs
L'e-mail d'invitation est personnalisé et comprend :
- Votre nom en tant qu'expéditeur
- Votre message personnalisé (si fourni)
- Un bouton direct pour ouvrir la salle de données
- Un lien en texte brut comme alternative
Les visiteurs cliquent sur le lien et arrivent directement dans votre data room. Si vous avez activé des paramètres de sécurité sur le lien (comme la vérification par e-mail, la protection par mot de passe ou les exigences de NDA), les visiteurs devront suivre ces étapes avant d'accéder aux documents.
Liens uniques personnalisés par destinataire
Chaque invitation génère un lien unique associé à l'adresse e-mail du destinataire. Cela signifie que :
- Suivez qui a accédé à quoi par destinataire, sans avoir à deviner de qui provenait la visite
- Révoquez l'accès individuellement : si une transaction échoue avec une partie, révoquez uniquement son lien sans affecter les autres
- Personnalisation et permissions : chaque destinataire bénéficie de la même vue, mais vous pouvez modifier les permissions par destinataire si nécessaire
- Pas de transfert de lien : si un destinataire transfère son lien à quelqu'un d'autre, le nouvel visiteur devra tout de même passer par la vérification par e-mail et sera enregistré séparément
Vous pouvez consulter le statut des invitations (en attente, acceptée, consultée) pour chaque destinataire dans l'onglet Permissions. Utilisez cette fonctionnalité pour effectuer un suivi auprès des personnes qui n'ont pas encore accepté l'invitation.
Révoquer une invitation individuelle
Si vous devez supprimer l'accès d'un destinataire :
- Ouvrez la data room et accédez à l'onglet Permissions.
- Recherchez le destinataire dans la liste des invitations.
- Cliquez sur le menu à trois points situé à côté de son nom.
- Choisissez Révoquer l'accès.
Le lien unique du destinataire est invalidé immédiatement. Les autres destinataires de la même campagne continuent de fonctionner normalement.
Suivre qui a été invité et qui a consulté
L'un des principaux avantages d'envoyer des invitations via Papermark est la possibilité de comparer qui a été invité avec qui a réellement ouvert la data room.
Après avoir envoyé les invitations, accédez à l'onglet Analytics de votre data room pour voir :
- Quels destinataires ont consulté la data room
- Combien de temps chaque personne a passé sur chaque document
- Quelles pages ont retenu le plus d'attention
- Si des documents ont été téléchargés
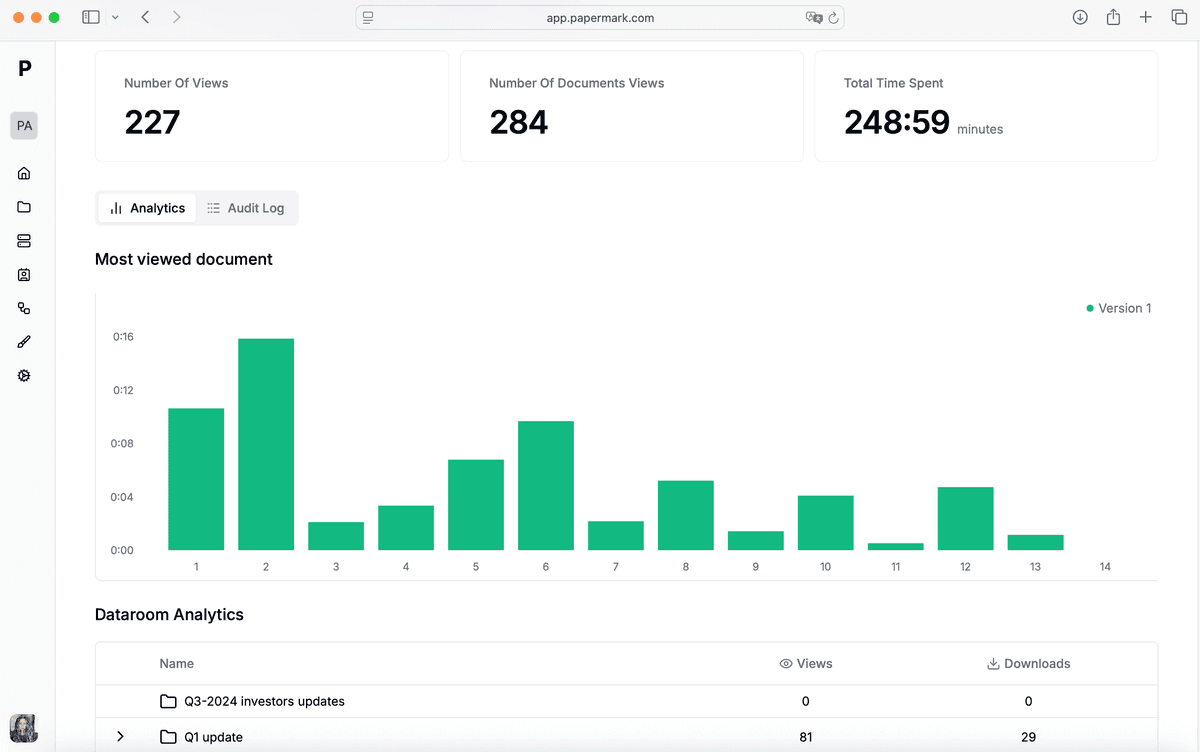
Cela vous donne une image claire de l'engagement et vous aide à faire un suivi auprès des bonnes personnes au bon moment.
En savoir plus sur l'analyse des documents et l'analyse des visiteurs.
Conseils pour des invitations par e-mail efficaces
Nommez vos liens de manière descriptive. Avant d'envoyer des invitations, donnez à votre lien un nom clair comme « Série A - Sequoia » ou « Due Diligence - Groupe Acheteur A ». Cela facilite le suivi du lien correspondant à chaque audience dans vos analyses.
Utilisez des liens distincts pour différentes audiences. Plutôt que d'envoyer le même lien à tout le monde, créez des liens distincts avec les paramètres de sécurité appropriés pour chaque groupe. Vous pouvez ainsi contrôler les autorisations de fichiers et suivre l'engagement par audience.
Activez la vérification par e-mail sur le lien. Lorsque la vérification par e-mail est activée, vous obtenez une identité confirmée pour chaque visiteur — non seulement les personnes que vous avez invitées, mais aussi toute personne à qui le lien a été transféré.
Définissez une date d'expiration pour les transactions urgentes. Si les documents ne sont pertinents que pendant une période limitée, ajoutez une date d'expiration au lien avant d'envoyer les invitations. En savoir plus dans les paramètres de date d'expiration.
Effectuez un suivi grâce aux analyses. Consultez vos analyses un jour ou deux après l'envoi des invitations. Si des destinataires clés n'ont pas encore consulté la data room, envoyez-leur un rappel discret.