How to customize your data room layout?
Your data room layout controls what visitors see the moment they open your data room. In the data room Branding settings you can pick a layout preset, choose how documents are displayed, show or hide the navigation tree, turn the banner on or off, and add your logo, colors, and a welcome message. This guide shows you each option and how to set it up.

Layout customization is available on the Data Rooms plan (and during the free trial).
Where to find layout settings
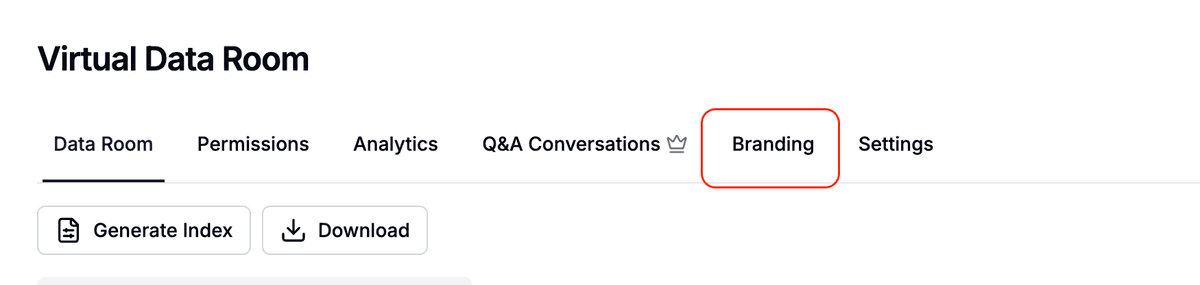
Open your data room and click the Branding tab in the top navigation.
Inside, you'll see two tabs:
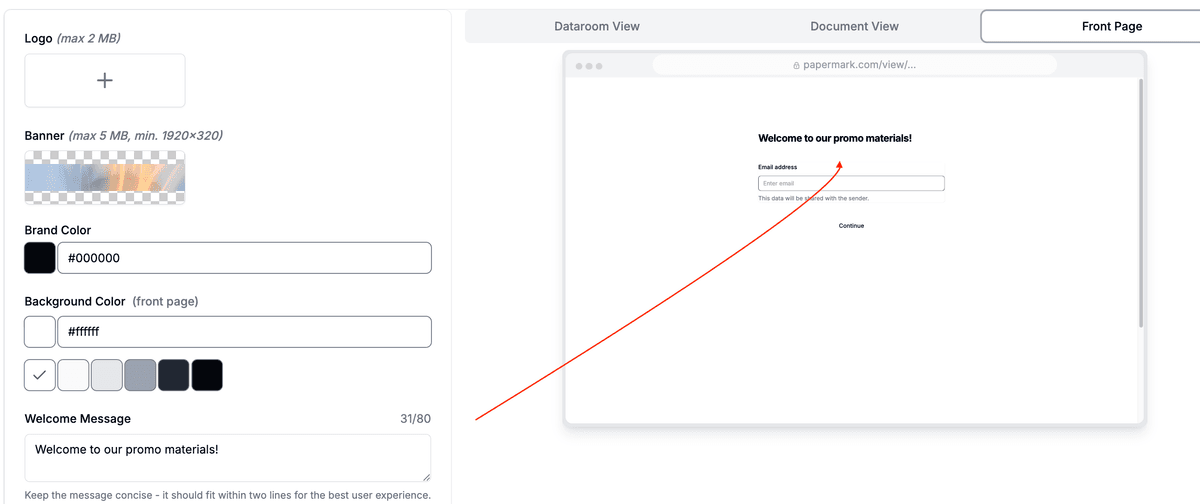
- Branding: logo, banner, brand color, background color, language, and (under Advanced settings) the welcome message and call-to-action button.
- Layouts: the layout preset, banner visibility, navigation tree, and document card layout.
A live preview on the right shows your changes in real time across three tabs: Dataroom View, Document View, and Front Page.
Choose a layout preset
In the Layouts tab, pick a preset under Data Room layout. Each preset sets the banner, navigation tree, card layout, and header style together. If you change the toggles manually afterwards, the layout switches to a custom combination.
| Preset | Banner | Navigation tree | Document card layout | Header |
|---|---|---|---|---|
| Default | Shown | Shown (left column) | Cards | Standard |
| Standard | Hidden | Hidden | List | Standard |
| Modern | Shown | Hidden | List | Split (title left, banner right) |
| Notion-style | Shown | Hidden | Grid | Notion-style |
- Default: a banner on top, the navigation tree in the left column, and documents as cards. Best for larger rooms where visitors browse deep folder structures.
- Standard: a clean, minimal room with no banner and no navigation tree, and documents in a compact list. Best when you want the simplest possible view.
- Modern: a split header with your title on the left and banner media on the right, no navigation tree, and a compact list. Best when you want the banner to set the tone.
- Notion-style: a Notion-like header with documents shown as a grid of cards. Best for content-rich rooms and client portals.
Document card layout
Under Document Card Layout, choose how documents and folders appear in the main area:
- Grid: documents as a grid of tiles, best for visual browsing.
- Cards: larger card rows with more detail per item.
- List: a compact table with a number, name, and last-updated date, the most scannable option.
Navigation tree
The Navigation tree toggle controls the folder tree in the left column. When it's on, visitors navigate folders from the sidebar. When it's off, visitors use breadcrumbs and the main area only, which gives a cleaner landing experience.
Banner
The Banner toggle shows or hides a banner at the top of the room. Your banner can be an image, a video, or a YouTube URL, and you upload or paste it under the Branding tab. Tip: pasting a banner URL on the Standard preset automatically switches the room to the Modern layout so the banner has room to breathe.
Brand identity
On the Branding tab you can set:
- Logo: PNG or JPG, up to 2 MB (a transparent background works best)
- Banner: PNG or JPG, up to 5 MB, minimum 1920x320 pixels (or paste an image, video, or YouTube URL)
- Brand color: pick from the color picker or enter a hex code
- Background color: the color behind the front page and document view, with an option to also apply it to the data room view

Branding can be set globally so it applies to every document and data room, then overridden per room. For the full walkthrough, see How to customize data room branding.
Welcome message and call to action
Under Branding → Advanced settings you can add:
- Welcome message: a short note (up to 80 characters) shown to visitors on the front page before they see your content.
- Call to action: a button with a label and link that renders in the data room navigation, with its own accent color.
The welcome message and call to action are available on the Business plan and above.
Introduction page
For a richer welcome, you can also enable an introduction page, a full first-visit screen with a logo, a rich-text message, a "what's inside" overview, and an embedded YouTube or Loom video.

See How to add an introduction page to your data room for the full setup.
Step 1: Open the data room branding settings
In the left sidebar, click Data rooms and select the room you want to customize, then open Branding.
Step 2: Pick a layout
On the Layouts tab, choose a preset (Default, Standard, Modern, or Notion-style), or set the banner, navigation tree, and document card layout individually for a custom combination.
Step 3: Add your branding
On the Branding tab, upload your logo and banner, pick a brand color and background color, and (on Business and above) add a welcome message or call-to-action button.
Step 4: Preview and save
Use the preview tabs on the right (Dataroom View, Document View, Front Page) to check exactly what visitors will see, then click Save changes.